Research into the type of media to be used
for our narration of the events of 1916.
I began looking at the different types of
media we could use. Initially we agreed on animation, but had not fully settled
on whether is would be still images with basic motion or character s and/or
narration.
Below is the bulk of the research I have done into the different types of (1)Documentary Styles,(2) a 10 step guide into how you plan out and complete a short film/animation/documentary, (3) storyboarding your film.
1 : Documentary Styles
One source which took inspiration from Bill Nichols books Introduction to Documentary (2001)
and Representing Reality (1991), the 6
types of Documentery by Alex Burton(2015).
These are : 1 Poetic documentaries :
“Poetic documentaries, which
first appeared in the 1920’s, were a sort of reaction against both the content
and the rapidly crystallizing grammar of the early fiction film. The poetic
mode moved away from continuity editing and instead organized images of the
material world by means of associations and patterns, both in terms of time and
space. Well-rounded characters—’life-like people’—were absent; instead, people
appeared in these films as entities, just like any other, that are found in the
material world. The films were fragmentary, impressionistic, lyrical. Their
disruption of the coherence of time and space—a coherence favored by the
fiction films of the day—can also be seen as an element of the modernist
counter-model of cinematic narrative. The ‘real world’—Nichols calls it the
“historical world”—was broken up into fragments and aesthetically reconstituted
using film form.
Examples: Joris Ivens’ Rain
(1928), whose subject is a passing summer shower over Amsterdam; Laszlo
Moholy-Nagy’s Play of Light: Black, White, Grey (1930), in which he films one
of his own kinetic sculptures, emphasizing not the sculpture itself but the
play of light around it; Oskar Fischinger’s abstract animated films; Francis
Thompson’s N.Y., N.Y. (1957), a city symphony film; Chris Marker’s Sans Soleil
(1982).
2. Expository documentaries
“Expository documentaries speak directly to the viewer, often in the
form of an authoritative commentary employing voiceover or titles, proposing a
strong argument and point of view. These films are rhetorical, and try to
persuade the viewer. (They may use a rich and sonorous male voice.) The
(voice-of-God) commentary often sounds ‘objective’ and omniscient. Images are
often not paramount; they exist to advance the argument. The rhetoric
insistently presses upon us to read the images in a certain fashion. Historical
documentaries in this mode deliver an unproblematic and ‘objective’ account and
interpretation of past events.
Examples: TV shows and films
like A&E Biography; America’s Most Wanted; many science and nature
documentaries; Ken Burns’ The Civil War (1990); Robert Hughes’ The Shock of the
New (1980); John Berger’s Ways Of Seeing (1974). Also, Frank Capra’s wartime
Why We Fight series; Pare Lorentz’s The Plow That Broke The Plains (1936).”
3. Observational documentaries
“Observational documentaries attempt to simply and spontaneously observe
lived life with a minimum of intervention. Filmmakers who worked in this
sub-genre often saw the poetic mode as too abstract and the expository mode as
too didactic. The first observational docs date back to the 1960’s; the
technological developments which made them possible include mobile lighweight
cameras and portable sound recording equipment for synchronized sound. Often,
this mode of film eschewed voice-over commentary, post-synchronized dialogue
and music, or re-enactments. The films aimed for immediacy, intimacy, and
revelation of individual human character in ordinary life situations.
Examples: Frederick
Wiseman’s films, e.g. High School (1968); Gilles Groulx and Michel Brault’s Les
Racquetteurs (1958); Albert & David Maysles and Charlotte Zwerin’s Gimme
Shelter (1970); D.A. Pennebaker’s Don’t Look Back (1967), about Dylan’s tour of
England; and parts (not all) of Jean Rouch and Edgar Morin’s Chronicle Of A
Summer (1960), which interviews several Parisians about their lives. An ironic
example of this mode is Leni Riefenstahl’s Triumph Of The Will (1934), which
ostensibly records the pageantry and ritual at the Nazi party’s 1934 Nuremberg
rally, although it is well-known that these events were often staged for the
purpose of the camera and would not have occurred without it. This would be
anathema to most of the filmmakers associated with this mode, like Wiseman,
Pennebaker, Richard Leacock and Robert Drew, who believed that the filmmaker
should be a “fly-on-the-wall” who observes but tries to not influence or alter
the events being filmed.”
4. Participatory documentaries
“Participatory documentaries
believe that it is impossible for the act of filmmaking to not influence or
alter the events being filmed. What these films do is emulate the approach of
the anthropologist: participant-observation. Not only is the filmmaker part of
the film, we also get a sense of how situations in the film are affected or
altered by her presence. Nichols: “The filmmaker steps out from behind the
cloak of voice-over commentary, steps away from poetic meditation, steps down
from a fly-on-the-wall perch, and becomes a social actor (almost) like any
other. (Almost like any other because the filmmaker retains the camera, and
with it, a certain degree of potential power and control over events.)” The
encounter between filmmaker and subject becomes a critical element of the film.
Rouch and Morin named the approach cinéma vérité, translating Dziga Vertov’s
kinopravda into French; the “truth” refers to the truth of the encounter rather
than some absolute truth.
Examples: Vertov’s The Man
with a Movie Camera (1929); Rouch and Morin’s Chronicle of a Summer (1960);
Ross McElwee’s Sherman’s March (1985); Nick Broomfield’s films. I suspect
Michael Moore’s films would also belong here, although they have a strong
‘expository’ bent as well.”
5. Reflexive documentaries
“Reflexive documentaries
don’t see themselves as a transparent window on the world; instead they draw
attention to their own constructedness, and the fact that they are
representations. How does the world get represented by documentary films? This
question is central to this sub-genre of films. They prompt us to “question the
authenticity of documentary in general.” It is the most self-conscious of all
the modes, and is highly skeptical of ‘realism.’ It may use Brechtian
alienation strategies to jar us, in order to ‘defamiliarize’ what we are seeing
and how we are seeing it.
Examples: (Again) Vertov’s
The Man with a Movie Camera (1929); Buñuel’s Land Without Bread; Trinh T.
Minh-ha’s Surname Viet Given Name Nam (1989); Jim McBride & L.M. Kit
Carson’s David Holzman’s Diary (1968); David & Judith MacDougall’s Wedding
Camels (1980).”
6. Performative documentaries
“Performative
documentaries stress subjective experience and emotional response to the world.
They are strongly personal, unconventional, perhaps poetic and/or experimental,
and might include hypothetical enactments of events designed to make us
experience what it might be like for us to possess a certain specific
perspective on the world that is not our own, e.g. that of black, gay men in
Marlon Riggs’s Tongues Untied (1989) or Jenny Livingston’s Paris Is Burning
(1991). This sub-genre might also lend itself to certain groups (e.g. women,
ethnic minorities, gays and lesbians, etc) to ‘speak about themselves.’ Often,
a battery of techniques, many borrowed from fiction or avant-garde films, are
used. Performative docs often link up personal accounts or experiences with
larger political or historical realities.
Examples: Alain Resnais’
Night And Fog (1955), with a commentary by Holocaust survivior Jean Cayrol, is
not a historical account of the Holocaust but instead a subjective account of
it; it’s a film about memory. Also, Peter Forgacs’ Free Fall (1988) and Danube
Exodus (1999); and Robert Gardner’s Forest of Bliss (1985), a film about India
that I’ve long heard about and look forward to seeing.
I can use these different
forms of documentary to analyse my own documentary technique. What I find
particularly interesting is the role truth plays in documentaries and how the
different forms presented here show facts in very different ways.”
2: 10 Step Guide
Step 1: Brainstorming
Think about the purpose of your story.
Is there a single issue that is unsettling your life and
that you want to tell the world about?Perhaps you’re affected by crippling
university fees, or poor housing; you may have had your EMA cut, or lost your
job. You might be under-employed with shift work that is insecure with no
benefits such as holiday or sick pay. You might be approaching thirty years old
with no prospect of owning a home of your own; this might be stopping you
having a family, or leaving you feeling insecure and lacking the confidence to
have an intimate relationship.
Make a spider graph and think of key words, events and
images linked to the issue. How do they connect and relate to each other? You
might want to look in magazines and newspapers, or search the internet for
related articles. Try Googling key words such as ‘Top-up Fees’, ‘Rent Trap’,
‘EMA Cuts’, or ‘Housing Benefit Cap’ and see what comes up.
Step 2: Planning
Now you have a rough idea of the theme of your story, take
some time to explore how you want to say it.
Do you want to make a documentary? Or do you want to make
a drama? Do you want to use animation?
Who else needs to be in your film? Do you need other
participants and how old are they? If they are under 16 years old, then you
will need to have permission from their adult parent or guardian to allow them
to take part in your film.
What is your budget and schedule? Do you have equipment?
Time? People’s time? Places? Will you need permissions for non-public
locations?
You probably won‘t able to answer all of these questions
now. Grab a friend, relative or teacher and share your ideas with them. Keep
talking and things will evolve. Buy a notebook and note your ideas as they pop
in your head or you’ll lose them.
Step 3: The Story
Now you can begin to piece together your story.
You will need to form a script. You might want a tight
script where actors speak word-for-word or you may wish to have the characters
improvise, giving them a stimulus.
If you are making a documentary, now is the time to
research the people you want to interview and come up with appropriate
questions to ask. If you are interviewing a young person, you may wish to ask
them how they feel about their job or education prospects. If you interview a
council official, you may wish to ask about the facts on why the education and
jobs policies are failing young people and give you exact figures of
unemployment.
Step 4: People
Who are the characters in your story? Take some time to
make a family tree of your characters and think about how they link together.
Think about their backgrounds. Try and make them as real as possible: What will
they wear, eat and drink? What is their family like? Why are they in the film
and what are they saying to the audience? You may have some key words or
phrases they will say.
If you are making a documentary, identify people to talk
to. For example, if your issue is about the scrapping of Educational
Maintenance Allowance (EMA) then you may wish to speak to teachers, your head
teacher, your local councillor or MP. The more senior the figure, the more time
you need to book in an interview slot. Remember, if you are not using your own
film equipment, then it is a good idea to book your filming dates close
together. Give yourself plenty of time to film each interview. You may find
your interview lasts an hour but you only use 40 seconds in the final cut. If
you are interviewing pupils or people under 16 years old then make sure you get
written consent from their parent or guardian.
See the sample release form below:
A Sample Release Form
Name (of contributor) ___________________________ in (name
of film) ______________________________
at _________________________________ (recording location)
on ___ ___ / ___ ___ / 2013
I understand that this film is to be submitted to the
Guardian newspaper landing page to be entered in the film competition
entitled ‘Young, Gifted and Broke?’ run by the Intergenerational Foundation, a
charitable organisation working for the intergenerational fairness for younger
and future generations.
I hereby give my permission to be filmed in the said film
without further consideration or compensation to the use (full or in part) of
all footage taken of me and/or recordings made of my voice and/or written
extraction, in whole or in part, of such recordings for the purposes of illustration,
broadcast, or distribution in any manner. I have read and understand the terms
and conditions and hereby give my consent.
Signed _____________________________________ Age (at time
of filming) _______________________
If you are under 16 (sixteen) years old at time of
filming, please ensure this release form is also signed by a parent or
guardian, with their permission of your involvement.
I, the legal guardian, (print name)
__________________________________ give permission for (name),
___________________________________________________ to
take part in the said film above.
Signed: _________________________________ Date ___ ___ /
___ ___ / 2013
Step 5: Framing
The way that you shoot the film is an important part of
getting the film right. Now is the time to experiment with basic camera angles.
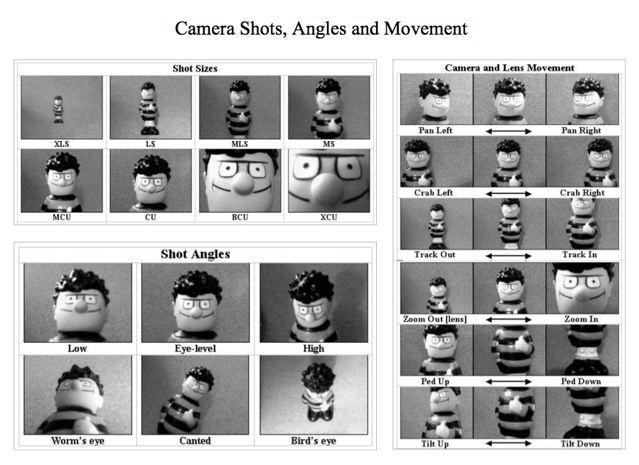
Pictured are the main shot sizes, camera angles and
movements
If you have never filmed before, take some time to
practise these shots before making your film and see how they can relate to
what you want to say. If you are interviewing you might wish to do some extreme
close ups of hands or the facial expressions but remember to do these after the
interview or have a second camera remaining the whole time on the interviewee’s
face.
Step 6: Storyboards
Now you have an outline of a script, and an understanding
of the various camera angles and shots you can use, you should begin to merge
these to break your story into scenes to make a storyboard. A storyboard looks
like a comic book, with pictures of scenes and a description of what is
happening in the picture and/or some dialogue.
A good storyboard will piece together the beginning,
middle, and end and help you to think of how to visualise each scene using
which camera angles and shot sizes.
Click here to find out
more on Storyboards.
Step 7: Scheduling
|
Scene
|
Location
|
Props
/ Dress / Equipment
|
Notes
|
Costs
|
|
Scene
1 – Rosie in her bedroom crying
|
Bedroom
|
Rosie
wears jeans and red top
|
Film
day one – need red top
|
58p
packet of cookies, £3.50 sandwich
|
|
Scene
2 – Rosie watches news
|
Living
room
|
Rosie
wears jeans and red top
|
Film
day one – need red top, TV.
|
|
|
Scene
3 –Rosie asking for jobs in restaurants
|
High
Street
|
Rosie
wear jeans and red top
|
Film
day three – need two cameras and need red top from day one
|
£10
lunch in cafe
|
|
Scene
4 – Rosie annoyed at still being unemployed
|
Home
|
Rosie
wear jeans and green top
|
Film
day one – needs green and red top
|
|
This is probably
the trickiest part of film-making.
Now you have your
storyboard, you may find some of your scenes happen at different times in the
story but in the same location. This means when you make a schedule of filming
your scenes, that you do all of the different scenes in the same location on
the same day. Be careful! You characters may need to be wearing the same clothes
for different scenes on different days that in the film are the same day. This
is called ‘continuity’.
Filming takes longer than you think! Try to film one scene
from your storyboard and this will give you an idea of how long it will take to
film the entire film.
Step 8: And ACTION!
Now comes the fun part: filming.
Try and film the same scenes from different angles so that
when you edit, the audience will have different things to look at. If you only
use one camera, film the same scene several times from different angles. Be
prepared to have hours of footage for what will be your final 3-minute film.
Allow for around two hours of filming per scene or per 30 seconds you will use
– this is based on when our youth worker makes movies with youth groups.
Time coding is also really crucial for when you begin to
edit your film. You need to have a pen and paper ready to record the various
takes of your scenes and record the time codes next to them (this is the time
set on your video camera) so that when you come to edit, you know that, for
example 19:13 (19 minutes 13 seconds) was your best take for scene
|
Scene
|
Take
|
Time
Code
|
Notes
|
Editing
Notes
|
|
Scene
1
Rosie
Cries
|
1
|
00:00
– 00:23
|
Rosie
giggled instead of criedECU Rosie’s eyes
|
Use
00:10 – 00:14 Good sad eyes for Rosie
|
|
Scene
1Rosie Cries
|
2
|
00:23
– 00:45
|
Perfect
|
|
|
Scene
2Rosie watches television, bored
|
1
|
00:45
– 02:02
|
CU
on Rosie face,CU Rosie’s hands holding television remote
|
|
5.If you are using
a phone or digital camera, you may find it best to simply delete the scenes as
you go along so you only have the ones you felt worked. But be careful of
deleting scenes too early! You may need some other angles and though the whole
scene may not be how you wanted it, you could edit two not so perfect scenes to
make the perfect final cut.
Step 9: Post-Production
Now comes the most time-consuming part: Editing or
post-production.
You now have your script, storyboard, schedule and your
time-coded notes on how all your scenes went. Using all your resources, you can
begin to piece together your film.
If you are new to editing, then look up a local youth club
where they have film editing equipment and a youth worker to help show you how
to edit. Your school may also have a film club or a teacher who knows how to
edit. If you are really stuck on how to edit, you can call Claire or Melissa at
IF and we can help put you in touch with someone who can help. Open Source
software is available, or check out Movie Maker with Windows
or Apple iMovie. If you have
a bigger budget, look at Final Cut Pro or Adobe Premiere.
Feedback:Once you are happy with your rough cut, review it
to people who can give you an honest opinion. Use these comments to polish up
your rough cut until you have your final cut, making sure you have all the
information you wanted to convey in the film as well as continuity and that the
final film is under three minutes long.
Step 10: Submit
So you have your 3-minute film and it is polished and
ready to submit. Congratulations!
Before you send it off to the Intergenerational Foundation
via the Guardian website, make sure
you have all the permissions you need, including any signed release forms that
show us the people in your film have agreed to take part and to be entered into
a film competition.
Make sure you review our terms and conditions once again
to make sure that you have met all the criteria. You can read them here.
Once you are happy, send in your film, pat yourself on the
back and relax!
Deadline 5pm, Wednesday 27th
March 2013
Good Luck!
3: Story Boarding your film
Storyboarding Your Film
Before you create your film storyboards, you have to perform
certain tasks and make certain decisions. First, begin by evaluating your
screenplay and picturing it in terms of separate shots that can be visually
translated into individual storyboard panels. Then you determine what makes up
each shot and also which images need to be storyboarded and which ones don't.
After you start storyboarding, you'll need to determine whether you're shooting
for a TV movie or a theatrical release, which will ultimately affect the frame
dimensions of your panels.
Breaking down your script
The task of turning your screenplay into a film can be very
overwhelming. But remember, a long journey begins with a single step, so begin
by breaking the screenplay down into small steps, or shots. A shotis
defined from the time the camera turns on to cover the action to the time it's
turned off; in other words, continuous footage with no cuts. Figure out what
you want these shots to entail and then transform those ideas into a series of
storyboard panels. Stepping back and seeing your film in individual panels
makes the project much less overwhelming.
Evaluating each shot
You have several elements to consider when preparing your
storyboards. You first need to evaluate your script and break it down into
shots. Then, as you plan each shot panel, ask yourself the following questions:
•
What is the location setting?
•
How many actors are needed in
the shot?
•
Do you need any important props
or vehicles in the shot?
•
What type of shot (close-up,
wide-shot, establishing shot, and so on) do you need?
•
What is the shot's angle
(where the camera is shooting from)? Is it a high angle? A low angle?
•
Do any actors or vehicles need
to move within a frame, and what is the direction of that action?
•
Do you need any camera movement
to add motion to this shot? In other words, does the camera follow the actor or
vehicles in the shot, and in what direction?
•
Do you need any special
lighting? The lighting depends on what type of mood you're trying to convey
(for example, you may need candlelight, moonlight, a dark alley, or a bright
sunny day).
•
Do you need any special
effects? Illustrating special effects is important to deciding whether you have
to hire a special-effects person. Special effects can include gunfire,
explosions, and computer-generated effects.
break
Creating a shot list
After you determine what makes up each shot, decide whether you
want to storyboard every shot or just the ones that require special planning,
like action or special effects. If you want to keep a certain style throughout
the film — like low angles, special lenses, or a certain lighting style (for
example, shadows) — then you may want to storyboard every shot. If you only
want to storyboard certain scenes that may require special planning, keep a shot
list of all the events or scenes that jump out at you so that you can
translate them into separate storyboard panels.
Even if you've already created your shot list, you aren't locked
into it. Inspiration for a new shot often hits while you're on set and your
creative juices are flowing. If you have time and money, and the schedule and
budget allow, try out that inspiration!
Constructing storyboard panels
Before you actually draw your storyboards, you need to create a
space for them to call home. The shape and dimensions of your storyboard panels
will be determined by whether your film is going to the TV screen or the
theatrical screen. These two different dimensions affect how much information
is drawn into your storyboards and what will ultimately be seen on the
appropriate screen.
A storyboard panel is basically just a box containing the
illustration of the shot you envision for your film. You can purchase pads of
storyboard panels in different format sizes at many art and business stores. If
you don't want to spend extra dollars on a pad of professional storyboard
paper, you can draw your own panels — four to six on a regular 8-1/2 x 11 piece
of paper (keeping them at a legible size), or you can even print blank storyboard
panels using your desktop computer. Here are some quick steps to design your
own storyboard panels:
1. Decide which shape and size of panel to
use.
A television storyboard panel, like the screen on your
television set, resembles a square, only slightly wider. Theatrical
feature-film storyboards are rectangular in shape, almost twice as wide as a
television screen (see Figure 1). Many filmmakers hope for a theatrical release
and also like the picture information available with the larger, rectangular
storyboard panel, but shooting a happy medium between the two is safer. You're
more likely to end up on TV and you don't want a lot of your picture
information lost on both sides of the image.
2. Draw the shape of the panel and add a
thick black border (approximately 1/2 inch in width) around the square or
rectangle.
Placing a border around each panel helps you to see each panel
as a definitive separate shot, and subliminally creates the illusion of a TV or
darkened theater around your shot, giving you an idea of what that individual
image will look like. With theatrical panels you may want to avoid the thick
border to save on page space (and black ink!).
3. Create a description panel by drawing a
1-inch empty box just below the bottom of the frame panel (as shown in Figure
1).
Use this box to write down important information that describes
in detail what the illustration doesn't show or enhances what is drawn in the
frame above. For example, include any important dialogue, camera directions,
scene numbers, or special-effects instructions.
No comments:
Post a Comment